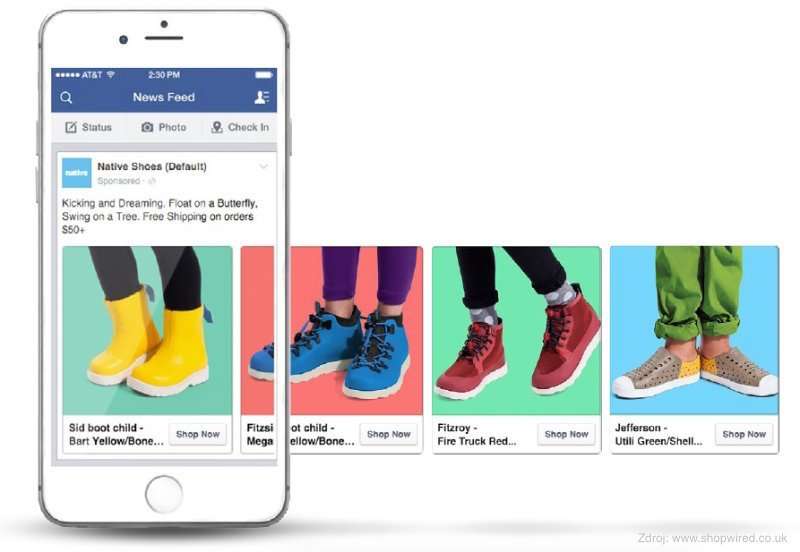
Facebook dynamic creative is a  new advertising tool that came out that can put together different creative materials in a way that makes sense. The system chooses different parts of the ad (pictures, videos, titles, etc.) and puts them together in different ways to make creative schemes. to your audience to figure out which creative mix works best. Dynamic creative ads can be used to increase the number of people who buy a product, traffic, video views, reach, brand awareness, and more.

You can upload up to 10 pictures or videos to dynamic creative content, and you can also upload up to 5 segments of text, title, description, etc (pieces). According to Facebook marketing partner ROIHunter, users who took part in the dynamic creative test said that the number of people who bought things from the online store and downloaded the app went up a lot. Also, using assets that change helps lower CPI ( cost per install).

The exact method of operation is as follows:

Add events and install Facebook Pixel

The first thing you need to do is set up the Facebook Pixel and put the code on your website. Follow the steps below to do this.

a. Click “pixel” in Ads Manager.

What is Dynamic Creative

b. Click “Create pixel.”

Dynamic Creative

If you click on it, a small string of code will show up that you need to copy and paste into the header of your website. If you’re not very tech-savvy, you can email the developer for installation instructions, use the partner integration, or use the tag manager. After the setting is done, the pixel needs to be tested to make sure it works normally. If the status says “active,” the setting is done.

c. Add events

Dynamic Creative

Events are common things that people do on a web page, like look at a product, fill out a form, or buy something. When you set up events, it will be easy to remember important business. As you can see in the picture below, different pixels can add different events, and events like viewing content, adding to the shopping cart, and buying have higher weights. Pixel events can help you make a list of potential customers, such as people who looked at a product but didn’t buy it.

Make a list of your products on Facebook

The second step is to make a list of all the products that Facebook sells. This is a list of names, prices, descriptions, pictures, brands, and other information about products. You will need to send this information to Facebook so that ads can be made from it. Here are the steps you need to take to set up a product catalog:

a. Go to the ad manager and choose the directory from the list of assets. Select the best category for the product in the Catalog Manager and click Next.

c. Upload and change the settings for the directory

Facebook lets you upload information about products using forms, data sources, or Facebook pixels. It also lets you link to other websites.

Web site for doing business

If the seller is small, it won’t take too long to upload by hand, and large and medium-sized sellers can use the e-commerce platform’s automatic import feature. With Leadsbridge’s Catalog Sync, you can also automatically post products to Facebook.

d. Type in the name of the directory, then click “Create” to see the page in the image below.

Follow the steps below to set up ads for products that change over time:

Create a product set

You can group products into different product sets with the help of product sets, so that different products can be shown when the campaign is running. Click on the set of products shown in the picture below.

Click “Make a product set.” Set up rules for your campaigns. For example, you can choose to show the product again to people who saw it but didn’t buy it.

Choose your audience

It is best to start with a large group of people so that Facebook can collect data on activity and user feedback. This will help Facebook figure out which parts of the audience will see which products after the ad runs. You can either retarget people who looked at the product page but didn’t buy, or you can go after new users.

There are four ways to reach your audience again:

  • Viewed or added to cart but not bought: This option promotes the product to users who have looked at the product or put it in their cart but haven’t bought it within the time limit.

*Added to cart but not bought audience: This option promotes the product to people who put it in their carts but didn’t buy it within the time limit.

*Collocation sales, which help promote products to people who have seen one product within a certain time frame and another product

  • Cross-sell products, or show users who have bought something else that you also sell.
  • Show potential users the right products
  • Choose a budget and place for your ad. Facebook recommends using automatic delivery, and the budget depends on your product and goals, with a minimum daily budget of $5.
  • Set the ad optimization delivery to “link clicks,” and then click “continue.”
  • Choose the Facebook page and Instagram account you want to use for your campaign.
  • Choose a way to advertise
  • Write the copy for the ad